When it comes to HDR photography, everybody seems to have an opinion. While some photographers call it a valuable instrument, others frown at its often kitsch results. Nevertheless, its utility cannot be overlooked when it comes to shooting photos with a wide range of tone. No camera can yet capture both ends of the spectrum while keeping all details in sharp focus. Even the most stubborn photographers have to admit that HDR photography is a pretty good compromise. Let’s find out more about this photographic practice and how to master it.
High Dynamic Range: a not so technical definition
HDR involves shooting a sequence of photos (usually three) using different exposures and then blending them together with the help of a post-processing software. It’s that simple. Or is it? Well, the aim is to capture both the shadows and the highlights of a scene in a single photo and that’s never a simple task. In this game of chasing two rabbits at the same time, “dynamic range” stands for the difference between the brightest highlights and the darkest shadows (white and black). And it’s measured in ‘stops’ or Exposure Values, if you were wondering. In a nutshell, HDR is a type of photo that has a very high dynamic range and manages to create stunning and mesmerizing copies of the reality.
Exposure bracketing
Sunrise and sunset are your typical HDR subjects but their exposure conditions exceed the tonal range of an ordinary camera. Therefore, to include the bright highlights, mid-tones and shadows in the picture, exposure bracketing is an absolute must. Set your camera to aperture priority, the exposure time on manual, and activate exposure bracketing if you want to minimize digital artifacts. Play with the exposure value and go for a big difference in stops, say +/- 2EV. After all, you’re preparing for a high dynamic range image.
As I already mentioned, a HDR consists of three separate images in RAW and JPEG format. A larger number of photos can improve the result, but at the same time it generates piles of data that will overload your PC. You will need a tripod to make sure all images are superimposed, but feel free to leave it at home if you’re going to use a professional software afterwards. Photoshop or Photomatrix do a great job at adjusting each pixel to great accuracy.
HDR – fast and easy
I recommend that Photoshop is very much part of the process, even if you choose to generate your HDRs using any of the other dedicated software. Aurora HDR (Mac only), Photomatix or Adobe Lightroom are very good choices. But, until you test the waters, let’s see how we can quickly create a HDR image and perfect it in this program.
1. Load frames in Adobe Photoshop
Prepare your images in a separate folder, open Photoshop, then go to File, Automate and select Merge to HDR Pro… option. Use Browse to select the files and confirm with OK. Don’t forget to check the Attempt to Automatically Align Source Images box if you wish to eliminate overlap errors caused by involuntary movement. Photoshop starts working on your frames and, after a short period of time, the conversion details are set. If the program does not have EXIF data in images to detect exposure differences, it will invite you to manually enter the values.
2. Set the tone distribution
The top of the setting window contains a list with many presets. Try Flat and Saturation, if you want to boost the colors. Carefully adjust exposure, contrast and details. Radius and Strength amplify the HDR effect while Shadow and Highlights allow you to adjust the brightness extremes.
3. Optical corrections
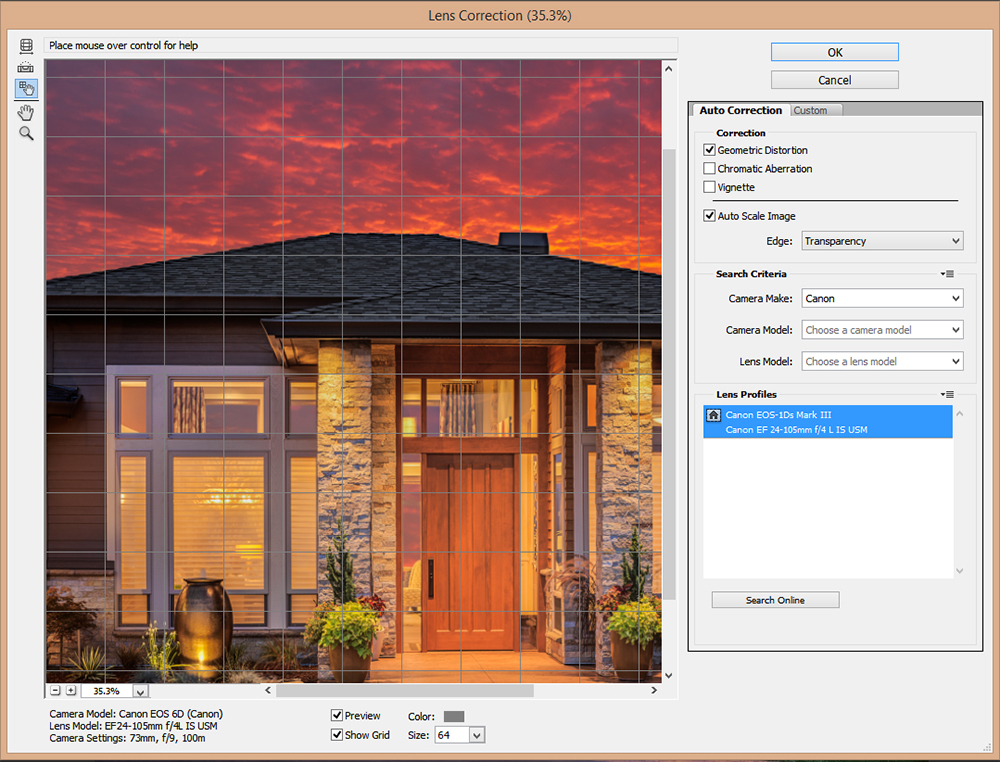
Confirm the settings with OK and wait for the program to process the data. Your program combines frames as best as it can, but there are still going to be some distortions. To mend this, you need to access Lens Correction in the Filter menu and activate the grid. Correct the distortions by using the Remove Distortion setting in the Custom menu. You can also try automatic corrections, but better not tick the Chromatic Aberration option as it does not work well with combined frames.
4. Increase clarity
In the end, you can increase the overall sharpness of the photo with the help of a dedicated filter, like Unsharp Mask or Smart Sharpen. Click on Filter menu and select Sharpen. Test both filters and choose whichever suits you best.
There you have it: a quick and easy way to create HDRs and some tips for improving the final result. Will this be a perfect image? It’s a good start, I give you that. Photoshop might not be the best solution, but it sure gets the job done with minimum headaches, and provides an array of tools to perfect it. Next time, we’ll talk about how to get a HDR effect with just one photo. Stay tuned for more!
Julia E. Miller
Related posts
1 Comment
Leave a Reply Cancel reply
This site uses Akismet to reduce spam. Learn how your comment data is processed.


[…] brief recap on how to get a HDR photo: pick a subject, shoot at least three consecutive images of it (with different levels of exposure), […]